28 June

Clock Tree Constraints in VLSI | ccopt file in Physical Design | CTS Constraints

Clock tree synthesis is a process of building and optimizing the clock tree in such a way that the clock gets distributed evenly and every sequential element gets the clock within a target global skew limit. To build the clock tree we have to provide certain constraints as input to the APR tool, which commonly known as clock constraints, and in the case of the Innovus tool, this constraint file is popularly known as ccopt file.

In this article, we will learn some important clock tree constraints which are commonly used in every design and their actual meaning that why those constraints provided. Now a day it's very common that if you are going to appear in an interview in physical design and your experience is in the bracket of 0-5Y, you have to face the question related to clock tree constraints in your interview.


clocks tree constraints:

  1. Clock tree cell list
  2. Preferred clock tree routing layers and Non-Default Rules (NDR)
  3. Target Skew
  4. Target Maximum Transition
  5. Target Maximum Capacitance
  6. Maximum Fanout
  7. Cell Density
  8. Cell Halo 

1. Clock tree cell list

We use clock inverters and clock buffers in the clock tree building. Sometimes we use only clock inverters and not clock buffers. We also use clock gating cells in the clock tree. so we have to provide the list of cells that we want to use in the clock tree.

set_ccopt_property inverter_cells {}
set_ccopt_property buffer_cells {}
set_ccopt_property clock_gating_cells {}
set_ccopt_property logic_cells {}

2. Preferred clock tree routing layers and Non-Default Rules (NDR)

We need to provide the top and bottom preferred routing layer for clock tree nets. We generally define here trunk and leaf net. the net which connects the clock to the sequential element's clock pin is called the leaf net and the net which delivers the clock to the leaf net is called trunk net.

set_ccopt_property  -name trunckRoute -top_preferred_layer <> -bottom_preferred_layer <> -preferred_routing_layer_effort high -non_default_rule 2w2s

set_ccopt_property  -name leafRoute -top_preferred_layer <> -bottom_preferred_layer <> -preferred_routing_layer_effort high -non_default_rule 1w2s

3. Target skew

Skew balancing is one of the challenges in clock tree optimization. We provide a target skew as a clock tree constraint. PnR tool will try to balance the skew within the given limit of skew.

set_ccopt_property -target_skew <> 

4. Target Maximum Transition

We provide a max_trans limit for clock nets in the clock tree constraint. The tool will try to meet the max_trans limit.

set_ccopt_property -target_max_trans <> 

5. Target Maximum Capacitance

We provide a max_cap limit for clock nets in the clock tree constraint. The tool will try to distribute the load capacitance and try to meet the max_cap limit.

set_ccopt_property -target_max_capacitance <> 

6. Maximum fanout

We limit the maximum fanout of any instance in the clock tree through this constraint. Tool will try to build the clock tree by following this limit. 

set_ccopt_property -max_fanout <> 

7. Cell Density

A maximum cell density limit is mandatory for the clock tree instances.

set_ccopt_property -cell_density <>

8. Cell Halo

We need to provide a halo around the clock tree instance to avoid a denser placement which may cause IR / Crosstalk issue. So we provide halo constraints in the x and y direction over the cells.

set_ccopt_property -cell_halo_x <>  
set_ccopt_property -cell_halo_y <>  


These are the main constraint which we provide before the clock tree building. There are some more constraints but the main constraints are explained in the above sections. The following image summarizes the clock tree constraints.

CTS Constraints


Thank you! Any suggestions are welcomed in the comment section.

05 June

Installation of Synopsys EDA tools

Most of the EDA tools used in the VLSI Industry are designed for use in UNIX operating system. These tools must require licenses to work which can be purchased from EDA Companies or a company that is authorized for sales and supports. Synopsys tools can be purchased either from www.synopsys.com or from authorized sales and support partner www.eigen.in (in India). 

Once you buy the tools, they provide login credentials on their website. Using the login credential the licenses and tools can be downloaded to your local machine/server. We can also update the licenses whenever it gets expired and we can also download the latest release of any tools from the website using the login credential. For Synopsys tools, we need to login into their official website https://solvnet.synopsys.com to download the tools and licenses.

Generally, EDA companies provide support to install the tools and help in case of any issue, but it's better to know the installation process of tools and basic debugging to manage the tools in our own hands. The following section is going to describe how to download and install the Synopsys tools in your local machine/server.

Step-1: Download the synopsys installer, SCL and tools setup files

Go to https://solvnet.synopsys.com and login with your login credentials.
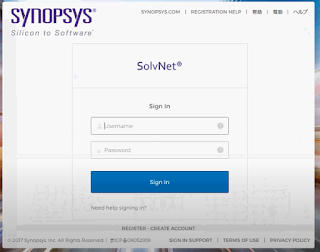
Solvenet Login

After login, you need to download:

  1. Synopsys Installer (An application which provinde nice gui interface to install the tools)
  2. SCL (Synopsys Common Licensing)
  3. All the EDA tools which you have license and want to install.
  4. Synopsys license (Incase it is not set already)


Step-2: Launch the synopsys installer GUI

Step-2.1: Open the terminal with root prevelage and go to the directory where synopsys installer is downloaded.


Step-2.2: Provide the execute permission to the synopsysInstaller.

chmod 755 synopsysInstaller_V3.2.run

Step-2.3: Run the following commands to unpack the installer ( -d switch is for creating a directory)

 ./synopsysInstaller_V3.2.run -d installer

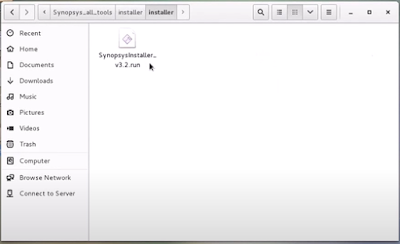
Step-2.4: Go to installer directory created in above step and if you see the contents, it will look like. 

cd installer

ls installer 


Step-2.5: Now we have to launch the installer in GUI mode by following command.

./installer -gui 

Step-3: Provide the source location (installation setup directory) and destination location (directory where you want to install the tool)

Step-3.1: After above step a GUI will be opened up. Now when we click to start, it will ask to site ID which is provided by synopsys when you purchase the tool.


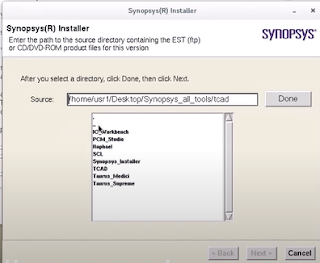
Step-3.2: Next we need to provide the source location where the tools is kept which we want to install.


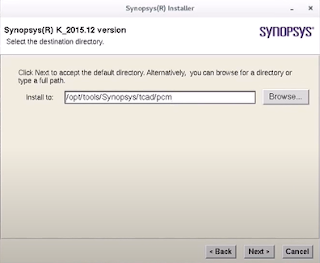
Step-3.3: Next we need to provide the destination location where we want to install the tool.


Step-3.4: Next we need to accept and proceed, after that installation will be started.


 In the same way, we can install all the tools.Once we done with installation we need to configure the license and set a path of all the tools in form of a bashrc/cshrc file. That will be explained in seprate article.


Thanks