28 August

Flip-flop and Latch : Internal structures and Functions

The flip flop is the most commonly used sequential element in any ASIC design, especially the D-type flip-flop. In the D flip flop, the D indicates delay, which means the output is a delayed version of input D.  Whereas a latch is the simplest and a basic sequential element. In general, there are two latches used to make a flip flop. the flip-flop is sensitive to clock edge and the latch is sensitive to clock level. The following section will explain the internal structure and operation of flip flops and latch. In this article, we will limit our discussion to only d type flip flops and d type latch which are most common in ASIC design. 


Schematic of the latch and flip-flop

The simplest design latch and flip-flop both are having 3 pins, One input data pin (D), one input clock/enable pin (CP/E) and, one output pin (Q). There could be a set and reset pins also but here for simplicity we are not including those in our discussion. The symbolic representation of a latch and a flip flop has been shown in figure-1.

Figure-1: Symbolic representation of Latch and flip-flop

In figure-1, the symbol of a posotive level sensitive d-latch and a positive edge triggered d flip-flop has shown. In negative latch and flip-flop only a dot appears before the E/CP pin. At a high level, we can think that latch and flip flop in terms of 2:1 multiplexer. A latch can be realized using a 2:1 multiplexer whereas to realize a flip flop, two multiplexers are required. Figure-2 showing the architecture of positive level sensitive d-latch and a positive edge triggered flip flop in terms of multiplexers.

Figure-2 : A positive d-latch and flip-flop using multiplexer

In a positive level sensitive latch the output is fed to I0 input of multiplexer as shown in figure-2. In same way in a negative level sensitive d-latch the output Q is fed back to input I1. A positive edge triggered d-flip flop is made of two negative level sensitive d-latch connected back to back. In case of negative d flip flop two positive level sensitive d-latch would be required. If we dive deep inside the multiplexer and go to the transistor level, we will find the transistor level schematic of a positive level sensitive d-latch and positive edge triggered d flip-flops as shown in figure -3.

Figure-3.a : A positive level sensitive d-latch using transmission gates

Figure-3.b: A positive edge triggered d flip-flop using transmission gates

A 2:1 multiplexer is made of two transmission gates and a transmission gate is made using a pMOS and an nMOS transistor as shown in the above figure. A latch is having two transmission gates in which the input of one transmission gate is connected to the output. A flip flop is made of two latches (that is four transmission gates) connected back to back as shown in figure-3. From the above figure, it is clear that a flip flop is having more transistors (double) as compare to a latch and hence a flip flop is having double the area as compared to the latch. The understanding of the working of latch and flip-flop is the most important part which will be discussed in the next section.


Working of a d- latch

The working of a positive level sensitive d-latch only is discussed here with the help of input and output waveform. The working of flip-flop will be discussed in the next section.

Figure-4: Input-Output waveform of latch

There are two transmission gates are used in a d-latch. In case of a positive level sensitive d-latch the output is feedback to the input of TGO transmission gate. Transmission gates are made of a nMOS and a pMOS as shown in above figure and it is being controlled by the enable signal E which is actually the clock signal. When the enable signal is high, the nMOS and pMOSof TG1 is in on state and at the same time, both transistors of TG0 are in off state and vice-versa happens when the enable signal is low. There is a direct path established from pin D to pin Q when the Enabe signal is high and it is called latch is in transperent state. But when enable signal goes low, TG1 gate is in off state and a feedback loop is established between Q to input of TG0 which insures that there is no change in output Q irrespective of changes in input pin D, which is termed as latch state. Figure-5 shows when the latch is transperent and when it is latched through the waveform. 

Figure-5: Working of a positive level sensitive d latch.

The working of a positive level sensitive d-latch is straight forward, it keep passing the input D to Q when its enable signal E is high and and it keep the output Q unchanged when enable signal is low. Same can be seen in figure-5, only output changes when input changes and enable signal is high.


Working of a d flip-flop

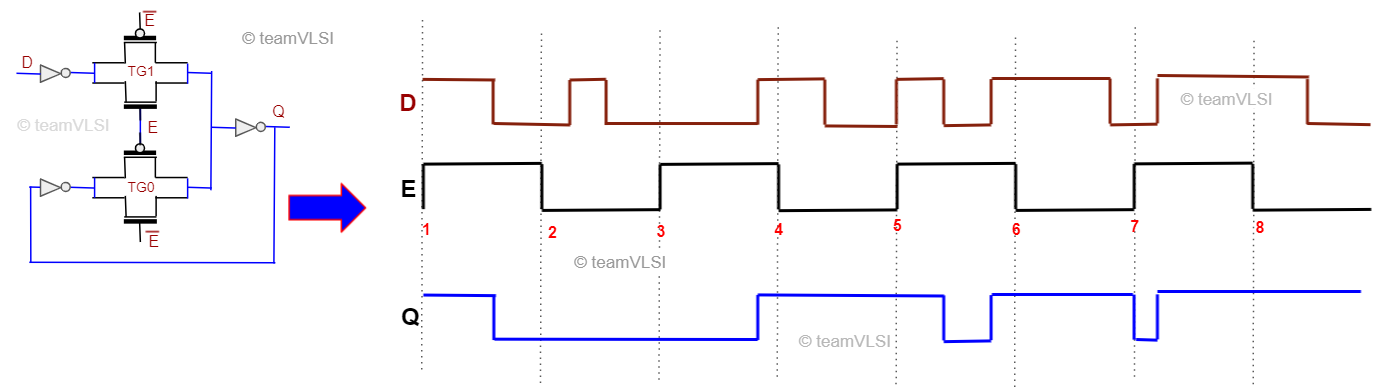
In a positive edge triggered d flip flop, there are two negative level sensitive d latch connected back to back and the second latch is having inverted enable signal as compare to first latch. This inverted enable signal to second latch makes sure that both the latch  never goes transperent or latched state simultaneously. A typical input output waveform has shown in figure-6 for better understanding.

Figure-6: Input output waveform of a positive d flip-flop

Lets consider the the case when the clock signal is low, the first latch is transperent and input D is transmitted up to QM point. But at the same time second latch will be in latched state because it gets inverted clock signal so the output Q is latched with QM. There is no chance the outupt Q will get changed in this duration.

The next moment when clock signal transits from low to high, the first latch will go from transperent mode to latched mode and second latch will go from latched mode to  transperent mode. So during the clock transition from low to high, whatever signal is sampled at QM previously gets transferred to the output Q.

The next moment when clock signal goes to high, there is not transfer of input signal D anymore and Wahtever signal previously samples at QM will be available at output Q.

The next moment when the clock signal transits from high to low, first latch will trasit from latched to transparent mode and second latch will transit from transparent to latche mode. So at this edge of clock transition there will be no change in output.

The operation of positive d flip flop can be summarized as, the output changes only at the rising clock edge and at this moment input D is trasfered to output Q and all other moment output is remain unchanged. So it is better in terms of avoid glitch as comapare to latch but more in area and more prone to process variation. For detailed operation and comparison please watch this playlist.


Thank you.


23 August

Tie Cells in Physical Design

The tie cell is a standard cell, designed specially to provide the high or low signal to the input (gate terminal) of any logic gate. The high/low signal can not be applied directly to the gate of any transistors because of some limitations of transistors, especially in the lower node. The limitation will also be discussed along with the schematic and operation of tie cells in this article. We will discuss the following sub-topics in this article.

  • Need of tie cells
  • Schematic of tie cells
  • The function of tie cells
  • Placement of tie cells


Need of tie cells:

In the lower technology node, the gate oxide under the poly gate is a very thin and the most sensitive part of the transistor. We need to take special care of this thin gate oxide while fabrication (associated issue is antenna effect) as well as in operation too. It has been observed that if the polysilicon gate connects directly to VDD or VSS for a constant high/low input signal, and in case any surge/glitch arises in the supply voltage it results in damage of sensitive gate oxide. To avoid the damages mentioned above, we avoid the direct connection from VDD or VSS to the input of any logic gates. A tie cell is used to connect the input of any logic to the VDD or VSS.

Figure-1: Need of tie cell


There are two types of tie cells.

  • Tie-high cell
  • Tie- low cell

As the name suggests, the tie-high cell's output is always high and the tie-low cell's output is always low.  


Schematic of tie cells:

The tie cell has no input pin and only one output pin. The output of the tie-high cell is always high and the output of the tie-low cell is always low and it is the glitch-free output that connects to the input of any logic gates. The schematic of tie high cell and tie-low cell is shown in the figure-2.

Figure-2: Tie-high and tie-low cells

In the tie-high cell, the drain and gate of nMOS are shorted together and connected to the gate of pMOS, and output is taken from the drain of pMOS. Whereas in the tie-low cell the drain and gate of pMOS are shorted together and connected to the gate of nMOS and output is taken from the drain of nMOS. The function of these schematics is explained in the next section.


Function of tie cells:

Both tie-high and tie-low cells have similar working. Here working of the tie-high cell is explained. A similar logic can think for tie-low cell. From figure-2 tie-high cell, the drain and gate of nMOS are shorted.

So Vg = Vd
==> Vgs = Vds
Therefore, Vds > Vgs -Vt

This shows that the nMOS will always be in the saturation region. The configuration of MOS where drain and gate are shorted is popularly known as a diode-connected transistor. And when nMOS is behaving like a diode here, the gate of pMOS is always low and so pMOS is always in on state. When pMOS is in on state its drain which is output will always be high.

Similarly, for the tie-low cell, the pMOS is always in saturation region so the gate of nMOS is always high and hence the drain of nMOS will always be at the low logic.

One more important thing is here that the sudden spike in VDD or VSS will be not propagated to the output of the tie cell.


Placement of tie cells:

Tie cells are not present in the synthesized netlist and not placed in the initial placement of the standard cells. Tie cells are inserted in the placement stage and more specifically at the final stage of placement. Where ever netlist is having any pin connected to 0 logic or 1 logic (like .A(1'b0) or .IN(1'b1), a tie cell gets inserted there. Click here to read more about the placement stage and the order where the tie cell get inserted in the placement stage.


Thank you.

21 August

Integrated Clock Gating (ICG) Cell in VLSI

 Low power ASIC design is the need of the hour, especially for hand-held electronics gadgets. In all hand-held products, the customer demands more battery life. This could be possible only if our SoC (System on Chip) inside the gadget consumes lesser power. There are various low-power design techniques that are being implemented the reduce the power consumption of application-specific integrated circuits (ASIC). The clock gating technique is one of the widely used techniques for low power design. Integrated Clock Gating (ICG) Cell is a specially designed cell that is used for clock gating techniques. In this article, we will go through the architecture, function, and placement of ICG cells.

Why ICG Cell?

ICG cell basically stops the clock propagation through it when we apply a low clock enable signal on it. This phenomenon is termed clock gating. We use the ICG cell to stop the clock signal propagation to a big group of logic cells when the group is not required to operate. This is done through a clock enable signal generated internally in the block and applied to the EN pin of the ICG cell.  We know that the total power consumption of an SoC is the sum of dynamic power and static power. The clock tree is a major contributor to dynamic power as the clock signal has maximum switching activities. The ICG cell allows to stop the clock signal propagation beyond it and it helps to reduce dynamic power consumption in the design.


The architecture of ICG Cell:

There are various ways to implement the clock gating techniques and there are many architectures of ICG cells also. Here the most common architecture is Latch-AND based ICG cell. 

Figure-1: Latch-and based ICG Cell

Prevention of glitches is one of the qualities of ICG cells. The latch-and gate based ICG cell is good on that front and that's why this architecture of clock gating circuit is used widely. There are various architectures of ICG cells but we are limiting our discussion to only this architecture in this article. 

The function of ICG Cell:

Figure-2: Waveform of ICG Cell

As shown in the above figure it provides a glitch-free clock gated output. and passed the clock single only when the enable signal is high and stop the clock propagation when enable signal is low. 


Why not only AND gate as a clock gating?

The issue with the AND gate as clock gating is, it can not provide a glitch-free output whereas a glitch-free clock wave is highly desired. 

Figure-3: AND gate as a clock gater

If there is a transition in clock enable signal when the clock signal is low, there is no effect on the gated clock. But if there is a transition in clock enable signal when the clock signal is high, there will be a glitch in the gated clock. To suppress such glitches, latch-and gate based ICG cell is preferred. 
The placement of ICG cells will be discussed in the next article.

Thank you

Important questions from Readers:

1. Why do we use Latch in ICG why not flip flop? (by Ramcharan)
Ans:
1. As we not that flip flop will capture the data only at the edge of the clock signal so any data change between one active edge to next active edge will not be captured.
2. If we use -ve edge FF the setup timing requirement for FF to ICG will be half cycle which is again difficult to meet in case of ICG placed near the sink.
Here is a waveform showing the differences in operation.


04 August

Physical Design Interview Questions for 3 years experience , Question set - 8

Code: EXIM4Y062021PD


Experience level : 3 years
    1. Brief Introduction and major projects?
    2. Tell me the most challenging part of your recent project
    3. How does the lockup latch help to fix hold violations?
    4. If we add a lockup latch, it might violate the setup? How will we fix it further?
    5. How did you fix SigEM? What are patch wires?
    6. What CTS constraints have you used?
    7. How did you fix the setup violation?
    8. Apart from setup and hold, what other checks do we perform in timing signoff?
    9. What are the PV checks?
    10. What are the sanity checks we do before starting PnR?


    11. What are the reports of synthesis we check before PnR?
    12. What are the physical cells we have used in PD and what are the uses of all those?
    13. What is the latch-up issue and how well tap cells prevent latchup?
    14. What is the endCap cell and what is the purpose of using that?
    15. What is Dcap Cell and why do we use it?
    16. What is the antenna effect?
    17. What are the ways to fix the antenna effect?
    18. How do antenna diodes help to fix the antenna violations?
    19. If we have timing criticality and we can't use antenna diodes or floating gates, How can we fix the antenna?
    20. If antenna violation is already the highest metal layer and we can use higher metal for metal hopping, how will fix the antenna?
    21. How will you fix the antenna violations on via?
    22. What is a metal cut layer?
    23. What is the crosstalk delay?
    24. What is the crosstalk noise?


Physical Design Interview Questions : Question set -7


Code: CDN5Y062021PD


Experience level: 5 Years
For Application Engineer


  1. What are the major differences between 7nm and 12/14nm technology nodes?
  2. What are the new DRC rules in the 7nm technology node?
  3. What is the via-piller?
  4. What is double patterning?
  5. How many layers have double patterning in the 7nm node?
  6. How tool performs placement steps?
  7. Why do we perform scan chain reordering?
  8. What is scan mode, why do we need that?
  9. What is ECF (Early Clock Flow) flow?
  10. What are the benefits of ECF flow?


  11. Can you explain the CTS flow?
  12. What are the low power techniques used in data and clock paths?
  13. Where does the clock-gater use?
  14. Have you built a custom clock tree?
  15. What are the constraints you have given to the clock tree?
  16. How did you solve max_trans violations in the clock path?
  17. How to provide different clock tap points in H-Tree?
  18. How many clocks were there in your block?
  19. How were they related?
  20. How did you analyze the clock domain crossing paths?
  21. What is a lock-up latch and how does it helps in hold fixing?
  22. What was the target skew in your block?
  23. What value of skew you achieved?